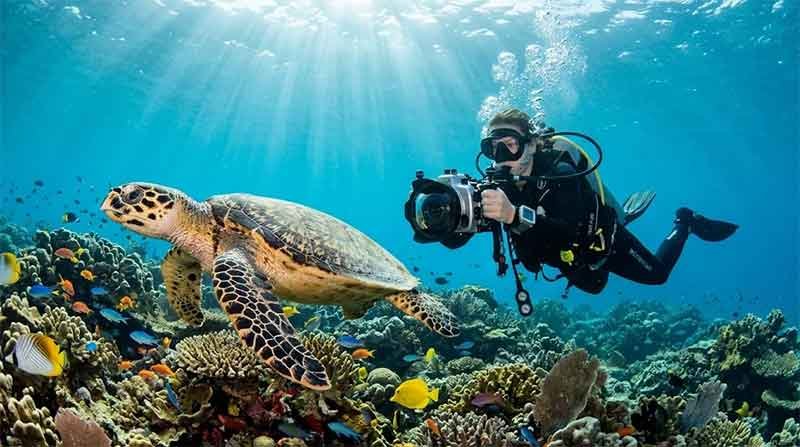
Diving is one of the most searched topics amongst scuba divers. Whether you use a compact underwater camera, action camera or professional mirrorless camera system, there’s some key things you can do to take stunning underwater photos.
Water can cause light issues, colours vanish and everything is always on the move!
However, by gaining some knowledge on the basics of underwater photography and improving your diving skills, you’ll be able to consistently take crisp, colourful images that you’ll be able to remember.
Why Underwater Photography Is Different
There are several differences to consider when taking photos underwater. The water causes light to be absorbed quickly and you’ll notice that red/orange/yellow colours will start to fade.
Also, depending on how clear the water is, there may be backscatter (white spots). The animals are unpredictable so timing and patience will be required.
Understanding these issues will help you take better photos.
Improving Your Diving Skills
A common mistake many beginner underwater photographers make is to focus too much on the camera and forget about improving their diving skills.
Having good buoyancy control will give you:
- A stable platform to take your photos from.
- Help prevent damage to the corals.
- Avoid kicking up sand/sediment.
- Get closer to marine life.
- Reduce camera shake.
The better your diving skills become, the easier it will be to take beautiful underwater photos.
Choosing the Right Camera
You don’t need to spend a fortune to take amazing underwater photos.
Action Cameras
Action cameras are lightweight and affordable to make them perfect for beginners. They’re great for:
- Wide angle reef shots.
- Taking videos of your dive.
- Travel photography.
Compact Underwater Cameras
Compact cameras have:
- Improved image quality.
- Manual settings.
- RAW imaging.
- Interchangeable wet lenses.
They’re great for a balance between portability and quality.
Mirrorless/DSLR
Many professional underwater photographers will use a mirrorless or DSLR camera as they have:
- Larger sensors.
- Quick autofocus.
- Better low light performance.
- Better image quality.
- Manual settings.
However, they will require a larger underwater housing and will cost more but they will provide amazing results.
Getting Closer
One of the main rules for underwater photography is:
If you think you’re close enough, get closer!
The water will affect how sharp and contrasted your images are. The further away your camera is from the subject the worse your image will be.
Getting closer will help you to:
- Make your images sharper.
- Have more colour.
- More contrast.
- Less backscatter.
- More detail.
Always approach marine life slowly.
Understanding Natural Light
Light behaves differently underwater.
As you go deeper into the water:
- Red will disappear first.
- Orange will start to fade.
- Yellow will start to fade.
- Blue will become the dominant colour.
This is why many images taken deep underwater look very blue.
The best natural light is usually:
- On a sunny day.
- In shallower water.
- Early in the morning.
- Late morning (before the sun gets too harsh).
Try to have the sun behind you.
Using Artificial Lighting
Using underwater strobes or video lights will help bring back the colours.
It will give you:
- More colour.
- More contrast.
- Vibrant fish.
- Less shadow.
- Professional looking images.
By positioning your lights correctly, you’ll reduce backscatter.
Understanding Camera Settings
If your camera has manual settings, learning about exposure will improve the quality of your images.
Aperture
Controls how bright your image is. Aperture will also affect how much of your subject is in focus. A smaller aperture will mean more of your subject is in focus, this is great for macro photography.
Shutter Speed
Controls movement. A fast shutter speed can help you to:
- Freeze swimming fish.
- Sea turtles.
- Dolphins.
- Divers.
A slow shutter speed can cause your images to be blurred if the camera isn’t stable.
ISO
You want to keep your ISO as low as possible. This will help reduce the digital noise.
Only increase your ISO if needed in dark environments.
Taking RAW Images
Whenever possible take your images in RAW format.
This will give you more information to work with. You’ll be able to:
- Bring back your highlights.
- Fix your white balance.
- Improve exposure.
- Bring back colours.
- Minimise loss of quality in editing.
They take up more storage space but give you much more flexibility when editing.
Composition
A good composition will turn your average image into an amazing one.
Try using:
- Rule of thirds.
- Leading lines.
- Negative space.
- Natural frames.
- Symmetry.
Try to shoot your subjects at eye level.
Focusing On Eyes
When taking photos of marine life, always try to have your eyes in focus.
Whether you’re taking photos of:
- Clownfish.
- Sea turtles.
- Sharks.
- Seahorses.
- Octopus.
Having the eyes in focus will create a stronger emotional connection.
Good Body Position
Often forgotten, having a streamline body position will help.
- Hover horizontally.
- Move slowly.
- Keep your fins away from the corals.
- Avoid sudden movements.
This will help keep your images sharp.
Patience With Marine Life
Many underwater photographers miss amazing opportunities due to moving too quickly.
- Slow down.
- Be observant.
- Predict movement.
- Wait for interesting interactions.
Often the fish will get used to you if you stay calm and don’t chase them.
Being patient will often give you more natural images.
Cleaning Your Lens
Before every dive:
- Wipe the port.
- Remove fingerprints.
- Check for water droplets.
- Check O-rings.
- Ensure there’s no dust inside.
Having a clean lens will help your images be much clearer.
Don’t Kick Up Sand
If you kick the bottom you’ll cause:
- Less visibility.
- More backscatter.
- Cover corals.
- Disturb the marine life.
Try to use proper frog kicks or gentle flutter kicks to minimise sediment.
Wide Angle Lenses
Wide Angle Lenses are great for:
- Corals.
- Wrecks.
- Schools of fish.
- Whale sharks.
- Manta rays.
- Divers.
They’ll allow you to get closer whilst keeping large subjects in your frame.
Macro Lenses
Macro photography is amazing for capturing small creatures that we often don’t pay attention to.
Popular macro subjects include:
- Nudibranchs.
- Shrimp.
- Pygmy seahorses.
- Frogfish.
- Blennies.
- Tiny crabs.
Macro photography requires patience and having good buoyancy.
Improving White Balance
Improving your white balance will help bring back realistic colours. Some cameras allow you to manually set your white balance underwater. This will give you more natural looking images.
If you’re using RAW you can edit your white balance.
Don’t Mess With Marine Life
Never try to manipulate marine life to get a better photo. Avoid:
- Touching marine animals.
- Chasing wildlife.
- Blocking their escape.
- Damaging corals.
- Feeding the fish.
Taking ethical photos will help protect the marine ecosystem and give you real images.
Editing
Editing is part of professional underwater photography. Common edits include:
- White balance.
- Exposure.
- Contrast.
- Sharpness.
- Reducing noise.
- Bringing back colours.
Don’t over edit your images to make the marine life look unrealistic.
Practicing
The best underwater photographers have practiced hundreds of dives. Each dive will teach you something new about:
- Lighting.
- Composition.
- Marine life behaviour.
- Camera settings.
- Buoyancy.
- Creativity.
The best way to improve is to practice regularly.
Common Mistakes
Many beginners make the same mistakes. These include:
- Too far away.
- Not having good buoyancy.
- Only using automatic settings.
- Chasing fish.
- Taking photos in poor visibility.
- Not cleaning the port.
- Kick up sand.
- Over editing.
Knowing these mistakes will help you learn quicker.
Safety First
Never let taking photos distract you from diving safely. Always:
- Keep an eye on your air.
- Know what depth you’re at.
- Keep an eye on your dive computer.
- Keep an eye on your buddy.
- Have good buoyancy.
- Follow your dive guides instructions.
No photo is worth compromising your safety.
Final Thoughts
Learning how to Take Better Underwater Photos diving is a rewarding experience. It requires you to improve your diving skills, knowledge of photography, patience and creativity. Taking amazing underwater photos isn’t about spending a lot of money on equipment but understanding the light, having good buoyancy, respecting marine life and practicing regularly. By focusing on composition, having the correct camera settings, diving ethically and improving, you’ll be able to take amazing photos every time you dive. As time goes on you’ll gain more confidence and improve your skills to take vibrant underwater photos. This will help you capture unforgettable moments whilst diving and encourage others to appreciate and protect our oceans.
FAQ
What’s the best camera for beginner underwater photography?
Action cameras and compact underwater cameras are great options. They’re easy to use, lightweight and will give you amazing image quality.
Why do my underwater photos look blue?
As you go deeper the blue wavelengths are more prominent due to the warm colours being absorbed by the water. Using artificial lighting or fixing your white balance will help bring the colours back.
How can I reduce blurry underwater photos?
Improve your buoyancy, get closer to your subject, use faster shutter speeds and have a stable body position.
Is RAW better than JPEG underwater?
Yes! RAW images will give you much more information to work with. This will make it much easier to bring back colours, exposure and white balance.
What’s the most important skill in underwater photography?
Arguably having good buoyancy control is the most important skill. It will help you be more stable, protect the marine environment and compose more sharp professional looking images.
Related Posts: